README
1 Repository overview
This repository is structured as follows:
- A 1_docs folder, containing related documentation, includes schematic diagrams, data sheets, pictures of each example configuration, pin elicitation diagrams, and pin assignment tables.
- A 2_tools folder, containing Development tools. Such as Flash download software, USB virtual serial port driver, and serial port terminal, etc
- An example folder, containing examples of different peripherals.
- A libraries folder, containing HAL library for STM32H5.
2 Board Resources
Here aims to introduce the hardware and software resources of the M48Z-M33 Mini Board, including the introduction of chip resources, the introduction of experimental platform hardware resources, and the supporting resource use guide. By studying this manual, the reader will have a comprehensive understanding of the resources of the Mini Board, which will be very helpful for subsequent program design.
It is intended to provide readers with a comprehensive introduction to the M48Z-M33 Mini Board resources. It is highly recommended that you read this manual before learning the examples!
2.1 Hardware Description
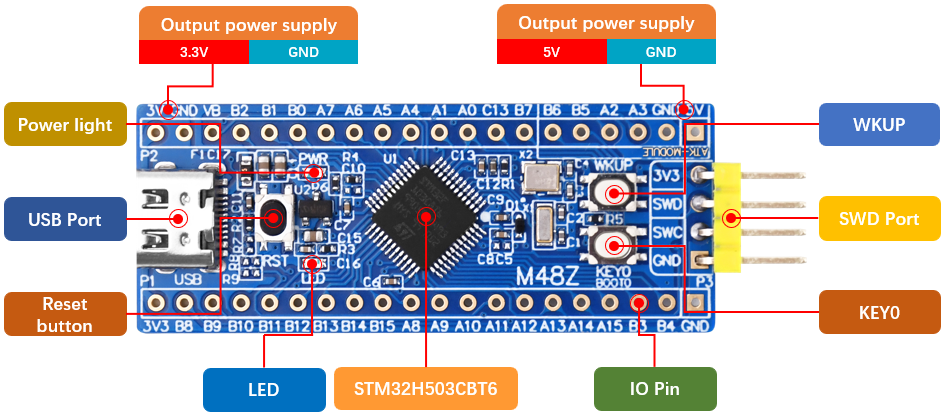
M48Z-M33 Mini Board selects STM32H503CBT6 as MCU, the chip integrates FPU instructions, It has 32KB SRAM, 128KB FLASH, 6 16-bit timers, 1 GPDMA controller (total 8 channels), 3 SPI, 3 full-duplex I2S, 3 U(S)ART, 1 FDCAN, 1 12-bit ADC, 1 RTC (with calendar function) and 37 general IO ports.
- USB interface: this interface can not only be used as a USB slave communication interface, but also has a power supply function, which can supply power for the Mini Board. USB_Slave can be used to connect the computer to realize the USB virtual serial port experiment.
- SWD debug port: used for simulation debugging, downloading code, etc.;
- Reset button: used to reset the Mini Board.
2.2 Software Resources
There are up to 35 examples provided. Before learning each example, carefully read the README.md, which includes a brief introduction to the example function, hardware hookup, STM32CubeIDE configuration instructions, and running phenomena. Here are all the examples.
| Num | Example Name | Num | Example Name |
|---|---|---|---|
| 00 | h503_test | 12 | 12_RTC |
| 01 | 01_LED | 13_1 | 13_1_LowPower_PVD |
| 02 | 02_KEY | 13_2 | 13_2_LowPower_Sleep |
| 03 | 03_EXTI | 13_3 | 13_3_LowPower_Stop |
| 04 | 04_UART | 13_4 | 13_4_LowPower_Standby |
| 05 | 05_IWDG | 14 | 14_DMA |
| 06 | 06_WWDG | 15_1 | 15_1_ADC_Single_Channel |
| 07 | 07_BTIM | 15_2 | 15_2_ADC_DMA_Single_Channel |
| 08_1 | 08_1_GTIM_Interrupt | 15_3 | 15_3_ADC_DMA_Multi_Channel |
| 08_2 | 08_2_GTIM_PWM | 16 | 16_ADC_Temperature |
| 08_3 | 08_3_GTIM_Capture | 17_1 | 17_1_DAC_Output |
| 08_4 | 08_4_GTIM_Count | 17_2 | 17_2_DAC_Triangular_Wave |
| 09_1 | 09_1_ATIM_NPWM | 17_3 | 17_3_DAC_Sine_Wave |
| 09_2 | 09_2_ATIM_Compare | 18 | 18_FLASH_EEPROM |
| 09_3 | 09_3_ATIM_CPLM_PWM | 19 | 19_RNG |
| 09_4 | 09_4_ATIM_PWM_IN | 20 | 20_MALLOC |
| 10 | 10_TFTLCD_MCU | 21 | 21_IAP_Bootloader |
| 11 | 11_USMART | 22 | 22_USB_VSP |
3 How to use STM32CubeIDE
If you have not set up STM32CubeIDE or can't use it, you will need to do so following the steps outlined in this tutorial.
4 Accessories
When using the MIni Board, you can use the following accessories.
| LCD module | Dap Debugger | USB to Serial Port module | Digital Oscilloscope |
|---|---|---|---|
 |  |  |  |